Showing posts with label Bind-it-all. Show all posts

Friday, January 21, 2011

Let Your Light Shine -- ScrapbookPal.com


My second project for ScrapbookPal.com this month is this cute little mini-notebook.  The Country Life cartridge has so much fun artwork that you might totally overlook!  (And guess what -- it's on sale for $29.99 at ScrapbookPal right now!)  I fell in love with this vintage-y lantern and the phrase to go with it, and I thought it would also be the perfect way to showcase these neat Distress Stickles in Picket Fence. I used them to give the "glass" part of the lantern that perfect vintage glass look, and it's gorgeous in real life. 

Little notebooks like this make great gifts and are quick and easy to make!  Here are some instructions for how I put it together.

1.  Cut chipboard for covers.  I like to make my mini-notebooks 4.25"x5.5", so that I can cut regular letter-size papers into quarters for the filler pages.
2.  Cut filler pages to match covers.
3.  Decorate cover as desired.
4.  Bind notebook.  I used a Bind-it-all, but you could also use a Cinch, jump rings, or even take it to a copy shop and have them bind it for you.  (Seriously, though -- if you like the idea of making your own books, a Bind-it-all is a GREAT investment.)
5.  Add a few ribbons to the top.  I wouldn't go too crazy with these, though, because too many will make your book less functional.
6.  Brighten someone's day with a cute little gift!  Or tuck it in your purse for yourself  -- I'm not judging...  (I still haven't decided the destiny of this little cutie.  I originally intended it for a gift, but I just love it so darn much!)

Materials:  PP -- Cosmo Cricket "Happy Together" collection; Ribbon -- Stampin' Up, Offray; Die Cuts -- Cricut Country Life cartridge; Distressing -- Colorbox Chalk Ink in "Chestnut Roan"; Binding -- Bind-it-all; Distress Stickles -- Ranger Inks

Saturday, December 15, 2007

Birthday Party for my mom!


I've been working on the plans for a big 50th birthday bash for my mom for months, and last night was the big night! I was so happy with how everything turned out (even though she wasn't really surprised after all...).

It all started with this adorable free digi-kit by Ronna Penner, which I downloaded from www.shabbyprincess.com. I used the flowers and paper from the kit to create this invitation. I drew the dress, balloons, and body parts on white paper with a thick marker, then scanned them in so I could work with them in my graphics program. I LOVED the result -- so much in fact, that I decided to base all the decorations for the party on the colors and feel of the kit!

I made these centerpieces for all the tables using Bazzill cardstock that coordinated with the kit. I cut all the hats from the Cricut Celebrations cartridge. This was the first time I used this cartridge! I never thought I wanted it, but I couldn't resist when I found it for $25. I'm SO glad I gave in! I bought these little tin pails at WalMart and put floral foam in the bottom. I painted bamboo skewers white and added the hats to the top, then filled the pails with curled ribbon. Each centerpiece was sitting on an oversized flower that I printed from the digi-kit.


Here are a few more examples of the various centerpieces:


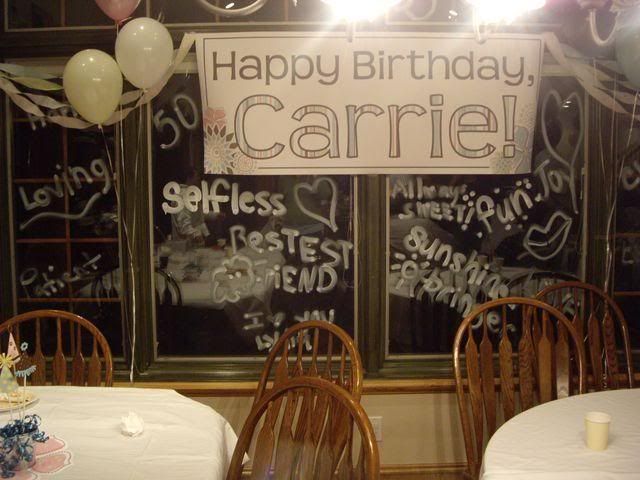
Here's one of my favorite parts of the decorations! I printed this 2' x 5' banner on my dad's large format printer using elements from the kit. Then I made use of my parents' huge windows and the darkness for a fun and meaningful idea -- I got one of those markers they use for writing on car windows and asked all the guests to write one word they thought described my mom. She totally loved it!


I used the base design of the invitation to make this guest book/album, bound with the Bind-it-all. All the guests signed it, and there is plenty of room for pictures. I printed the inside pages with a border and some of the flowers from the kit, so they are all ready to adhere the pics and do some journalling, and the album will be done!


After the party was over, I grabbed my favorite out of all the party hats to make a card! I created the circle card with the window using Cricut Design Studio by making two 5" circles, welding them together, then adding a 3" circle to the middle of one of the big circles. I then cut the yellow scallop (which is the edge of the card -- the brown in the background is just so you can see the yellow better) with Mini Monograms and adhered the circle card to it. I added a 4" white circle to the inside for writing. I adhered the hat to the front, added the doodle outlines with a white gel pen, and wrote "happy birthday" on the band. I love it!


Phew! I have to admit I'm exhausted, but I love how it all turned out! And the best part of all is that it made my mom feel so happy and loved, and that was the whole point!

Tuesday, October 23, 2007

A cute album of my cute little nephew!


I made this album for my SIL for her birthday. The pictures are really the star of this book -- aren't they amazing? My brother took them -- if you're in Utah, you should totally check out his photography website www.capturethem.com. He's awesome! He's taken some totally precious pics of my two boys you'll see in an album soon!

Anyway, back to facts... I used a handy-dandy swatch book from Daisy D's for the pages. These books are SO great -- 24 double-sided pages, already pinked, in 12 different designs. I just painted around the edges of the photos and slapped 'em on! I also added some buttons, Quickutz rub-ons, and Making Memories quote strips. I put the whole thing together with my bind-it-all. On the inside cover I cut a daisy from the Walk in My Garden cartridge at 2 1/2" and a Making Memories pocket. The stamp is from Autumn Leaves. And by the way, my spending ban is still in full swing -- who knew I had such great stuff in my stash?! TFL!

Tuesday, October 2, 2007

CD Date Book -- bound with Bind-it-all


This is the project I worked on during the SWARM his past weekend. I made it for a couple different reasons. I'm a consultant for Memory Works, and I've been meaning to make a bunch of products using just the contents of one of the kits (to show in case I ever do get around to having parties and such!). I use my Cricut so much in my paper crafting, I wanted to do this one without. I did use it to cut the circles, but that's all. The pattern papers and chipboard are all from We R Memory Keepers. I bound the book with the bind-it-all -- a little tricky with the cds, so I think I need more practice on that. But I sure like the finished result! And I definitely need a date book -- for being such a dedicated card maker, I sure miss a lot of birthdays and such!

Tuesday, September 25, 2007

My first Bind-it-all project!


Yay for the Bind-it-all! I can tell I will really love it. I made this little guest book to go on a shelf in our guest room. I thought it would be so fun to have a little mini-book of all the people who come and stay with us. The book itself is about 6" x 4 3/4". The paper is from Wild Asparagus and the die cuts are all made with the Cricut. "Friends" is from Jasmine, cut at 2 1/2" (for 'friend') and 2" (for the 's'), with shadow. The tulip bunch is from Walk in My Garden, cut at 2 1/2" on border mode. The tag is from George, cut at 2" with shadow.


This is a view of the inside cover. I used the same cut from Walk in My Garden, plus a scallop circle tag from Alphalicious. "Welcome" is from Zooballoo, cut on silhouette mode at 1 or 1 1/4".


This is what the rest of the pages look like -- the left-hand side is for the guests' entry, then the right is a mat where we can put a little picture of them from their visit.


Thanks for looking!