Showing posts with label card pics. Show all posts

Tuesday, May 3, 2011

An Apple for the Teacher :)


It's Teacher Appreciation Week!  (Never mind that I thought it was last week and was killing myself to get projects done in time...)  My two boys are blessed with really wonderful teachers this year, so I was very happy to show them a little love.  When I was getting ready to make these cards, I intended to completely rip off this lovely Mother's Day card made by my fabulous friend Amy.  But as I pulled the design from A Child's Year up on my Gypsy, I noticed this cute apple cut-out card and my wheels went spinning in an entirely different direction!

To create this card, I first cut out the basic card shape.  I embossed the front of the card with my Cuttlebug and the Swiss Dots folder.  Then I went back on my Gypsy and hid the outer card contour so I could just cut the apple shape, which I did in red.  I also cut 3 circles (sized to fit the apple) out of book paper.  I created the little apple by layering the book-paper circles onto the center of the apple and then sewing them into place.  I think I saw the technique on a local show last year and I love the effect -- you fold out the pages after you've sewn them, and it adds a ton of dimension.  I inked the edges of the circles to add depth as well.  I also added little snips of green felt as leaves for my apple.

I cut a piece of patterned paper to fit the inside of the card and adhered it, then cut a piece of white cardstock for the center so I'd have a place to write the sentiment.  I used a notebook-edge border punch for the top edge of that piece.  Then, to make sure the apple was aligned just right, I closed the card and fit the apple into its space like a puzzle piece.  I added the sentiment "wonderful teacher" on little paper strips, then finished off the card with a little baker's twine (I just love that stuff!) and a little thank you tag.

Oh, and as a present, I am giving them this free printable from eighteen25 in a spray-painted red frame just like they show here:


Sam's teacher got hers last week and she really, really loves it!

Thanks for stopping by!

Friday, January 14, 2011

Flashback Friday -- Glitter? Gulp!

My lovely and talented friend Amy is the guest designer over at Flashback Friday today, so I thought I'd play along!  It's always a half fun/half cringe experience for me to go back and look at my early projects, and this one was no exception.  The challenge was to find your first project using glitter.  Glitter and I have a love-hate relationship -- it can often add just the right touch and make a project pop, but I struggle sometimes to use it to its best advantage.  My first glitter card was a total craft fail.  In fact, I'm pretty sure it's never seen the light of day until now...


How appropriate that it's a Valentine's card, since that's our next holiday!  This file was saved in my archives as "glitter crazy."

And just to redeem myself, I had to share my first successful use of glitter -- this big glittery snowflake card.  LOVE this one!


Hey, if you head over to Flashback Friday and play along, there is a really cute stamp set up for grabs.  Happy Friday!

Thursday, October 14, 2010

Hip hip hooray!

I've been dying to use this new "Togetherness" collection from Cosmo Cricket since I bought it last month, and now I finally had a chance!  I wanted to make a fun, happy card to celebrate my sister's big achievement, and this paper + this week's sketch from 2 Sketches 4 You was just perfect.

Materials:  Paper -- Cosmo Cricket; Die Cuts -- Cricut ("Hooray" from Storybook, birdy from Happily Ever After, label shape from Once Upon a Princess); Border Punch -- Stampin Up; Distressing -- Cat's Eye chalk ink

Thanks for looking!

Tuesday, October 5, 2010

Life's Ups and Downs -- Summer Vacation


This month ScrapbookPal.com sent me the Cricut Summer Vacation seasonal cartridge.  I've never tried one of these mini-type cartridges before, but this one turned out to have lots and lots of fun shapes to choose from.  I like the graphic style of it and I'm envisioning lots of fun projects I can use it for.  For my first one I chose the classic ferris wheel shape.  It's all one piece on the cartridge, but my 6-year-old had the brilliant idea to make it so it could really turn (and I couldn't say no to that, now could I?).  To make the ferris wheel turn, I just cut out two in the same size -- one in black for the base and one in green for the wheel -- then trimmed away the parts on each layer that I didn't want.  I then used a big brad to go through the hole in the middle so that it really will turn.  Fun stuff!  I do love an interactive card.  :)  ScrapbookPal also sent me a Tim Holtz Distress Ink pad in Old Paper.  I have to admit, I had to do some googling to figure out how to use it.    Man, there are a lot of cool things you can do with these!  I ended up using mine to add some general distressing to my ferris wheel and background papers.  Old Paper is the perfect color for that purpose.  (You can't tell in the picture, unfortunately, but I also sprayed the green layer of the ferris wheel and the bottom patterned paper with Glimmer Mist, just to make it a little snazzier.  Love that stuff!)

Other materials:  Patterned paper -- Scenic Route (top and bottom), Scribble Scrabble (green with little dots); Punch -- Stampin' Up; Brad - Making Memories; Foam Adhesive -- Thermoweb

Saturday, August 21, 2010

Be Happy!

Looking for the ScrapbookPal.com Blog Hop?  Click HERE or just scroll down!


I'm a major Cosmo Cricket addict.  I stalk their blog like nobody's business, and the past few days I've been totally smitten with the fun pinwheel cards their DT has been posting.  This weekend they are partnering up with SRM Stickers and giving away some great goodies, so of course I had to get in on the sketch challenge!  I have not yet been fortunate enough to get my hot little hands on their new collection "Togetherness" (with which I am in total scraplove), so I thought I'd take this as a chance to use up some of my hoarded scraps from "Little Dutch Girl."  I liked the juxtaposition of the whimsical pinwheels and the slightly more grown-up paper -- I thought it made a great cheer-up card for my lovely grown-up sister who is having a hard time.  And I super-heart these tiny type letters -- perfect for a short sentiment.  TFL!

Tuesday, September 1, 2009

A sweet little birthday card...


Sorry I've been so slow on posting -- I've been spending the last couple of weeks getting ready for baby Eliza's first birthday! (Not to mention Sammy starting kindergarten, Dan turning 30, plus all the other things life throws at us...) I haven't gotten the pictures of all the stuff I did Eliza's party ready for posting yet, so I thought I'd post this little birthday card in the mean time. My sweet little niece Amelia also turned one a couple of weeks ago. She lives all the way in England (sadness!), but I actually had it together enough to send her a card and present in time fore her birthday (gasp!). For someone who loves to make cards, I am really awful about getting them off in time. And there's my confession of the day.

I used an Autumn Leaves pp and ribbon set for this card, and my Cuttlebug for the embossing. Cricut cuts: I cut the number with Alphalicious and the tag with TBBM, then the little ladybug with Walk in My Garden. First time I've used that cart in a long time, but I think now that I have so much little girl stuff to do I'll be digging it out more often. The flowers on the ladybug are a punch. The pin is from Fancy Pants. This card is a great example about how sometimes you just have to go with the flow -- I originally started out with a great sketch from 2 Sketches 4 You, but this darn card would not behave itself, and the finished product bears no resemblance to the original sketch. TFL!

Friday, July 31, 2009

It's my Blogiversary -- time for blog candy!

Wow, I just realized that July marks my two-year "blogiversary," so I thought before the month is over I'd better do something to mark the occasion! Blogging -- both keeping up my own blog and hopping around to so many others -- has really become an important part of my life, and I'm so grateful for all the friends I've made because of it. I'm also coming up on 50,000 hits, so we've got all sorts of things to celebrate. So to create a fun-for-everyone type of party, I'm offering a pick-your-prize blog candy!

Option 1: Scrap goodies, of course! I've got a little prize pack together with some cute stamps, chipboard letters, and a whole slew of flowers and embellishments. Ooh, and a zig glue pen, which is a must have for gluing small bits.


Option 2: a $25 gift certificate to my etsy shop. If you're a Sure Cuts a Lot user, this is the prize for you! I have a ton of cute, completely original cut files perfect for use with your Cricut and SCAL. I also have some adorable fabric flower accessories and very unique wooden snowflake Christmas ornaments (those will be up by the end of August).


Option 3: If you're not a paper-crafter at all, I've included this option so you don't feel left out. With this option I'll send you 10 of my favorite handmade cards for your own personal card supply, or you can make your mom or grandma very happy by giving them as a gift. :)


All you have to do to enter this drawing is leave a comment telling me which prize you'd prefer, and if you have a blog, leave a link to where you've posted about the blog candy (you can also post to Facebook or Twitter). This blog candy offering will run for the next two weeks (until August 15th), and I'll pick a random commenter to win the prize! Thank you very much to all you wonderful friends in the blogosphere!

Tuesday, July 28, 2009

More cards for cakes!

My sister who made the gorgeous cake last week has decided to make a side business of it, and things are already going like gang-busters! We loved the cake/card connection so much that we've decided to team up, and I'll be offering coordinating paper crafts to her cake clients -- invitations, cards, party decor, favors, all that sort of good stuff. I decided to make a few projects to go along with some of her other cakes, just so she'd have some examples to show prospective clients.

Here is another totally gorgeous cake she made:


And I made this invite and gift bag to go along with it:


I used my Cricut and Plantin Schoolbook to create the gift bag, George for the shapes and letters, and Celebrations for the party hats.


Amy also made this completely lovely cake after being inspired by this mini-album I made last year:

So I made this cute card/favor combo to go with it:


These use the same Crate Paper combo as I used for the journal. I used my Cricut and the New Arrival cartridge for the "sweet pea" word and image, Mini-Monos for the scalloped circle, and TBBM for the little favor box. I also used a Martha Stewart hydrangea punch for the flowers on the box, and the Stampin Up scallop punch for the brown border on the card.

I'm so proud of my sister for finding something she has a gift for and just going for it -- she's a great example to me of being willing to take risks and try new things.

Sunday, July 19, 2009

Completely amazing!

My amazing, creative sisters Amy and Ange had a surprise for me at family dinner this evening -- they'd been experimenting with decorating cakes, and used a couple of my favorite cards as their inspiration. I was so touched that they did that, and the cakes are abso-freaking-lutely amazing. These pictures hardly do them justice, but I knew I had to post them for all to see!

This is the first one, created by my baby sister Ange:


It's based on this card, which I originally made for my dad to give my Mom for Valentine's Day.


This completely amazing piece of culinary art was created by my sister Amy.


It was based on this card, which I made for my sister Emily's birthday last year. I am SO in love with all the details she captured -- I felt like crying when we cut it up and ate it!


Here's me with my amazing sisters! Thanks, ladies -- I don't think you even know how much it means to me!

Saturday, June 20, 2009

Cardmaking on the go...

Greetings from beautiful western Washington! I'm here with my kiddos visiting my husband's family for the entire month of June, which means two things: #1 - I actually have a little more time to scrap than usual, because I don't have my usual never-ending list of household chores and once the kids go to bed I have actual free time, and #2 - I'm limited to the supplies I could cram into my rolling and shoulder totes. When I was packing my supplies I really only picked supplies for the layouts I had planned and didn't think too much about cards, but I've had several dfferent card needs come up unexpectedly. Definitely a challenge, but I've been having fun seeing what I could do with the supplies I had on hand.


I was glad to find a stamped Tilda stashed in my tote from my last crop for this card, and I borrowed my MIL's colored pencils to do the coloring. The paper is from a Crate Paper baby collection, the label shape I cut with my Cricut and my new Home Accents cartridge (I think I used that one for just about all these cards). The rub-on and the ribbon are from Stampin Up.


Once I got here I realized I had completely forgotten to do Father's Day cards for my hubby's dad and grandpas and my own grandpa, but I didn't have a lot of paper that was really masculine. I used scraps from this cute American Crafts line on kraft paper, and a stamp and curly label punch from Stampin Up. "Dad" and "Grandpa" were cut with the George cartridge.


For this card I used this week's sketch from 2 Sketches 4 You. I have to admit this was a tough one for me, but I was really pleased with how it came out. There's that label shape from Home Accents again, plus the flourish photo corner behind it. The paper is from Crate Paper, and I used my Heidi Swapp edge distresser to rough up the edges of the rectangles. That is definitely my favorite cheap tool!


Last week while we were here we were so sad to learn that my husband's grandma has breast cancer. We headed over to her house a day or two later for some quality time, and I wanted to take a quick card to let her know we care. She's such a bright, strong person I wanted to make a card that would reflect that. This paper again is from Crate Paper (same as the first card) and the butterfly is from Home Accents. I used my SU scallop border punch and rub-on.


This one is for my sister, who unexpectedly had to get her gallbladder out soon after I got here. I was so bummed I couldn't be there to help out, but I definitely wanted to send her all my love and moral support. I love this Crate Paper -- I couldn't resist buying it when I saw how well it matched this cool dandelion shape from the Home Accents cartridge. The oval frame was cut with George. The stamp, label punch, border punch, and ribbon were all from SU.


This last one was for a wedding of some close friends of my in-laws. Not the colors I would usually use, but these were their wedding colors and it really seemed to fit the bride and groom's personalities. Inside it says "You make a great pair!" My mother-in-law laughed when she saw it -- turns out the bride's email address starts with greenpear. I must have cardmaking ESP!

Whew! I feel very productive -- maybe less really is more! I've also finished a couple of layouts, but I haven't been able to get a good picture so you'll just have to stay tuned... :)

Friday, April 24, 2009

Mom (don't peek, all my moms and grandmas!)


I love making cards for Mother's Day -- it gives me a chance to do all sorts of pretty feminine things. I made this card using this week's sketch from 2 Sketches 4 You, which gave me the perfect framework to try out my newest cut file. Ranunculus is my new favorite flower, and I wanted to try something that would mimic the many ruffly layers and the intricate leaves, and this is what I came up with! The pp is from Crate Paper, and I cut "Mom" with the Cuttlebug Harmony alphabet. I also used a ticket corner punch from SU and finished with a dose of Glimmer Mist. I love the sophisticated sheen that creates! Just make sure you adhere all your elements securely -- it has a tendency to make the edges curl up. TFL!

P.S. If you're interested in the ranunculus flower cut file, I'll be listing it in my etsy shop later today. Thanks!

Tuesday, April 14, 2009

You're My Favorite


Yesterday marked one year since the death of my sweet little sister Carissa. For those of you who didn't know (or know of) her, she was an angel. She had Down's Syndrome, and she radiated a true spirit of Christ-like love. She always told everyone "You're my favorite!" And she meant it each time. My younger sister Amy declared April 13th to be "You're My Favorite" Day, a day when each of us could really focus on letting everyone around us know why we love them and why they're our favorite. I made this card for my parents using this week's 2S4Y sketch. I used Chattebox paper and an artisan label I designed myself then cut using SCAL and my Cricut. Oh, I also cut flowers using the George cartridge and added a Fancy Pants flower and a big American Crafts brad. TFL!

Wednesday, March 25, 2009

The fruits of a very fun weekend...

This past weekend was such a blast. About every 6 months we have a Cricut SWARM -- a crop with a bunch of my online Cricut friends from here in the area. On Friday we cropped and shopped (well, mostly shopped) together at the Scrapbook USA Expo, then on Saturday we had a crop at a local scrapbook store. So fun! And amazingly enough, I actually got a ton done this time! My goal was to get a lot of scrapping done, since I've mostly been making cards lately.

I've been planning this lo since Eliza was a month old -- these are pictures from her month-day every month, ending up with this adorable pic on her 6-month birthday. I got the pics printed in B&W because the colors were all so different. There are three tags with more 6-month photos and journaling behind the big photo. The PP is from Basic Grey, and the flowers are from MM and Heidi Swapp. I cut the 6 with Base Camp at 3 1/2", and the letter stickers are from October Afternoon.


Aw, my cute little Josh. He is so afraid of my mom's big dog, Beau. Beau just a big puppy and thinks the boys are puppies, too, so he gets a little exuberant. Joshy usually runs straight in from the car to Nana's house, but one day he mustered his courage and told Beau to "SIT!" and he actually did it! I happened to have my camera out -- lucky day! The chipboard letters are from Scenic Route and rub-ons are from American Crafts. The paw prints are from the Cricut Paper Pups cartridge and the pp is from Basic Grey. I used embroidery thread to sew on all the buttons -- thanks again to my friend Amy for reminding me to stick the buttons down with glue dots before trying to sew them on -- sure saves a lot of hassle!


This one is not my favorite, but I was glad to get a lo with so many photos done! Last November we took a little ferry trip with my in-laws and it was so fun.


These last two are for my album about Dan and me. I usually just have one photo at a time, so I do this book in 8x8. This first one is our first couple picture, taken right when we started dating so Dan could show me off to him mum. We're so young! The pp is from Chatterbox, and the little branch dies are from Sizzix. I cut "Beginnings" at 1" with the Cricut Base Camp cartridge. I used a Heidi Swapp edge distresser for the edges of the paper -- it's my favorite cheap tool!


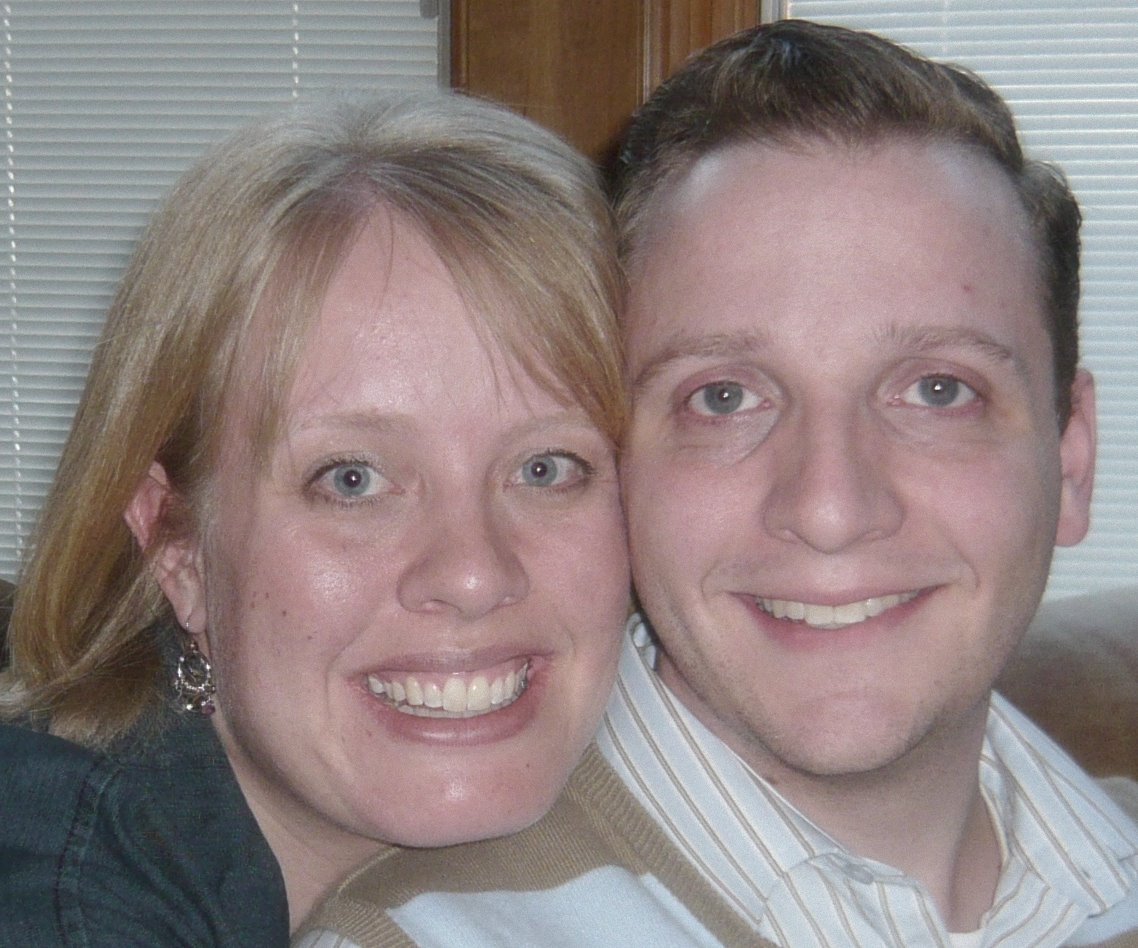
This pic is from only a couple weeks later, from the few days in between when Dan asked me to marry him and when I said yes. In my defense, we'd only been dating a couple weeks and he really took me off guard! :) There's a big long story that goes with it, which I think you'll be able to read better if you click on the pic and get the bigger version. The pp and chipboard letters here are from Scenic Route, and the ribbon is from SU (yay, Sale-a-bration!). Letter rub-ons are from American Crafts.


Of course, I couldn't leave cards out completely!

This one is an ATC (artist trading card) for our crop. I completely spaced the swap until I got there, so that was my first project of the day. I embossed the background with the Cuttlebug, then used my SU "Pocket Silhouettes" set and scallop and ticket corner punches to put together the rest. Phew!


This one was for our "Rummage Challenge," which I was in charge of. Each participant, before leaving home, was supposed to go to THAT PLACE in their scrapbooking area where supplies just pile up and get forgotten -- you all know what place I'm talking about! -- close their eyes, and rummage around. The thing they brought out was their main supply for the challenge, then I also rummaged in several of my areas and brought more supplies they could incorporate. It was cool to see how creative people could be! One of my rummaged supplies was a Mary Engelbreit desk calendar from 2002 -- I've kept it all these years because the illustrations were so wonderul and I knew I wanted to make cards from them someday. I picked this sweet quote and used scraps from my "Beginnings" layout to create this card. The label and scallop border punches are from SU.


I was half packed to go home when I decided I really wanted to finish just one more project, so I made up a few of these cute, quick cards. The background is embossed with the Cuttlebug, then I cut the scalloped oval with the Cricut Storybook cartridge. "Happy" is cut from Base Camp at 1". To make 5 quick cards, I loaded 5 scraps of bright adhesive paper on my mat and cut the word "happy" on each one. Then I just took one letter from each for each card. I outlined each oval and wrote "birthday" with a black marker. Easy peasy, and so festive!


Phew, you made it to the end! I had a blast this weekend, and it was wonderful to have so much to show for it. My kids thought the scrapbook pages were great -- they just love seeing themselves on layouts. Can't wait til our next SWARM!

Saturday, March 7, 2009

Congratulations Lovebirds!


This one is for my little brother Dan and his new wife Carrie, who just tied the knot yesterday! I would be concerned about them seeing this before they get a chance to open it, but I'm guessing they have better things to do at present than check my blog...

Teal and brown were their wedding colors, so I thought this Basic Grey paper was the perfect choice -- of course with a little red thrown in for the color of love... :) I used the Mojo Monday sketch for this week. The birdies came from the Cricut "Joys of the Season" cartridge (2 Turtledoves!), cut at 3", and the big background heart came from the George cartridge, cut at 4". I cut the scallop edge on that center strip with my new Stampin Up border punch, and the sentiment comes from the "Congrats" set in the current Sale-a-bration catalog -- still working my way through all my new goodies! :) TFL!

Wednesday, March 4, 2009

For the Bride - 2 Sketches 4 You & a new cut file too!


For this week's 2 Sketches 4 You challenge, I decided to use the new vintage dress form cut file I just created. I love the look of these dress forms and had so much fun designing different outfits to put on them. So far I've done this fancy dress, a vintage swimsuit, and a cute apron -- you can see them all in my etsy shop. For this card I used Wild Asparagus paper, and I stitched around the edges, and the lace is from a JoAnn bargain bolt. I cut the photo corners with my Cricut and the Jasmine cartridge at 2" on real dial size. I used a white uniball signo pen to write "for the bride." TFL!

I have to give a shout-out to my fabulously talented friend Sonia at Scraps4Fun -- she has a great blog with amazing projects. She recently had a blogging disaster and lost a lot of her data, but she's having a HUGE re-launch party with awesome blog candy. Can you say $50 of scrapping goodies?! Go check it out -- you'll definitely want to become an official follower.

Monday, March 2, 2009

I love the smell of new goodies in the morning...

There is something so inspiring about having new crafting goodies! For my birthday this year I had a little Stampin Up shopping spree and got a TON of the cutest stuff -- yippee! I've been so inspired by having all this great new stuff, so here are a few of the projects I've been dying to show you. Thankfully, my mom found my camera tucked into the pocket of an apron in her pantry -- oops. As Sammy said upon hearing the news: "She gets the dollar!"


This first one was a Valentine's Day project. We went to a church dinner dance, and I was in charge of decorating one of the tables. I had these cool dishes from IKEA, and I thought these little boxes went so nicely with them. Thanks, Brooke, for showing us how to make these at the party! The boxes are SO easy to make -- if anyone is interested I can post a video tutorial. I used the Manhattan stamp set for the flowers, the Curly Label stamp and punch for the label, and cut the "love" with the Cricut Opposites Attract cartridge at 1". I also used CDS and the George cartridge to cut out these hearts from red vinyl to apply to the glasses.


This one is from the 2 Sketches 4 You sketch from two week's ago. The pp is from Sassafrass Lass, and I used my own design and cut file for the notebook journaling spot (which I'll be putting up in my etsy shop when I'm finished here). I used my new "Little Leaves" and "Buttons #5" dies for the branch and buttons. The dotted lines are a jumbo stampin' wheel, named (appropriately) Dotted Lines, and the sentiment is from the "Sweet Little Sentiments" set.


Here's last week's 2S4Y sketch, which I rotated 180 degrees. The pp and stamps are from the "It's a Loop Thing" Sale-a-bration set (one of the best things about my party was that I got one of every single thing in the Sale-a-bration catalog FREE!). Oh, the sentiment is also from "Sweet Little Sentiments" set. I pieced the cupcake by hand. For the top part I just cut a circle in half, then used the SU scallop edge punch on the straight edge. I ran the bottom part through my paper corrugater to give it that cupcake-like texture. I made the cherry using the heart stamp from the set, and added CTMH liquid glass for a little shine.


This last card uses the "Thoughts and Prayers" set, which I think is SO pretty, which I colored with the Stamp and Write markers. I couldn't decide which background to use, so I just did one of each. The first one is embossed with the Cuttlebug text folder, and the second I did a little versamark stamping with the same floral branch stamp. Just a simple card, but I thought it turned out pretty.

Phew! Now that I have my camera back, I should be able to post projects more regularly. I still have 6 new SU sets I haven't even opened, so stay tuned! TIA!