Monday, December 12, 2011

Phineas and Ferb Birthday Party!

We just got finished with a birthday party for my two boys, and it was so fun I had to share right away.  My boys' birthdays are both in December, just 9 days apart.* Sam and Josh (along with the rest of the family) are huge Phineas and Ferb fans, so it didn't take much prompting on my part for them to love the idea of a P&F-themed party.  (Yes, I did prompt them.  I love Phineas and Ferb and I'm not ashamed to admit it.)

We started out with this invitation, which I designed on the computer using Phineas and Ferb clipart I found on Disney's Family website.  We left the name blank so we could just get a bunch printed as 4x6s at Walmart, then the boys wrote their friends' names on each one before delivering them.


I had three big ideas for this party, which came out with...hmmm...varying degrees of success. :)


1.  Dr. Doofenshmirtz pinata.  Dr. D. is the bumbling bad guy of the show (for you unlucky few who aren't familiar with the P&F world), whose evil schemes inevitably backfire.  Who better to be the pinata?  We even labeled the stick "The Whackinator."

As I searched Pinterest for DIY pinata ideas, this paper bag pinata tutorial stood out -- didn't seem like it could be much cheaper or easier than making a pinata out of a paper grocery bag!  The best tip on that tutorial was to cut the crepe paper while it's on the roll so you can just glue it on already fringed and awesome.  If anyone would like a step-by-step tutorial for this from me, I did take pictures so I can post one if you want it.  Basically you just fill the bag with candy, fold the top down and seal really well with tape, then hot glue miles of fringed crepe paper to the back.  On this one I started with the black in the center, then added the white for the lab coat.

Once I had the body done, I pieced the head, arms, and legs together from cardstock.  I may or may not have broken out the "Learn to Draw Phineas and Ferb" book I had gotten for Sam for his birthday a little early so that I could figure it out.  Very helpful!  The head and arms were hot glued on and held in place with bamboo skewers in the back.  For about 3 seconds I wondered if I should cover the skewers somehow, and then my sane person voice turned on and reminded me that a herd of children were just going to whack the thing to death in about 5 minutes anyway...


We got through almost all the kids twice before we ripped a big enough hole for the candy to start coming out.  That grocery bag was a lot tougher than I thought!  I had also reinforced the corners and bottom of the bag with packing tape (just a little) so it wouldn't break too early, but I definitely won't do that in the future.


2.  Invention activity.  This was hands-down the best part of the party.  When we first started planning, we talked about how P&F invent and build amazing things every day, so we decided that's what we should do, too.  We saved up all our cans and jars and cartons and lids over the past few months, then spread them out on the kitchen table with craft sticks, pipe cleaners, glitter glue, googly eyes, and other random crafty bits -- along with a LOT of glue and tape -- and told the kids to go wild and invent or build anything they wanted.  I wasn't sure how much they'd be into it, but it was a huge hit!  The kids were super creative -- we had robots and rockets and elevators and a cannon thing and tons of other stuff.  So fun.

.


3.  Perry the Platypus cake.  This was the toughie for me.  I have always wanted to decorate a cake with fondant, so when my lovely friend Janelle pointed me to this really awesome tutorial from Dabbled for creating a Perry the Platypus-shaped cake, I was so there.  But, as I posted on FB Friday night:


Today I learned two things:

1 -- Objects on the Internet may be more difficult than they appear.
2 -- Cake decorating will not be my avenue to fame and fortune.
This took a long time and my marshmallow fondant was SO not the right texture or consistency, and heaven knows it's not the right color.  I was about ready to throw in the towel, but once he was all done, all three of my kids were so excited and loved it so much that none of that even mattered.  And that's why kids are awesome. Also my hubby was very supportive through the whole thing, even when I was nigh unto tears after kneading that stupid fondant for an hour... :)  The boys helped me decorate the base cake with M&Ms and we had so much fun doing it together.


I am pretty proud of the tail...
 So, to sum up, the tutorial is really awesome and you should definitely check it out if you're interested in making a Perry cake.  Hers actually looks like Perry instead of Perry's fugly forest green cousin...  I will probably try fondant again some day, too.  Can't let the fondant win! :oD


 Thanks for stopping by!


*For anyone contemplating getting pregnant, I really recommend not having babies in December.  It's stinks when they're brand new and it's cold/flu/RSV season, and it's kind of a bummer your whole life.  I know this not only because both my boys are in December, but also my mom, two of my sisters, and my brother.  One of my sisters is even ON Christmas.  Everybody forgets your birthday because of Christmas busy-ness, you can't party outside, and there are always Christmas decorations in the background of your birthday pics...

Tuesday, December 6, 2011

Peg Doll Nativity


Ever since I painted my first peg doll family I have been pretty much in love with these cute little wooden people.  I've painted several more and even taught a little class on how to do it!  A couple of months ago I saw this peg doll nativity on Pinterest, and I was so inspired I knew I had to make my own!  This nativity might just be my favorite peg doll project of all.

I decided that I'd have each figure carrying something symbolic.  Mary has a heart because she gave the gift of God's love to the world.  Joseph has a lantern because he was the protector and guide for baby Jesus.


 The angel has the star, of course.  I added the other colors to give her a more folk art feel to coordinate with the wise men.
 Here we have the shepherd with his crook and a little drummer boy.  And I just love these little sheepies.

Probably my favorite part, though, is the three wise men and their camels!  When I was at Hobby Lobby looking for the flat-bottomed knobs for the sheep and donkey, I found these flat-bottomed egg shapes (which I think are for some kind of Japanese wooden doll) and I immediately thought my wise men were going to have to have camels.  I definitely spent the longest of all trying to figure out how to do their robes and treasures and those darn camel faces.


A project like this might seem a little intimidating, but these little dolls are so fun, and you can really make them as simple or as detailed as you like.  I started by doodling how I wanted each doll to look in my ever-present doodling notebook.  I googled things like "nativity" and "three wise men" and "camel face" to get some inspiration for the colors and designs of the different dolls and took inspiration from many different nativity sets and paintings.  It was so much fun that I am hoping to list some in my etsy shop next Christmas!

P.S.  I bought my peg dolls at www.CraftParts.com.  All the "adult" dolls are about 3 1/2" tall.  I found the stable at Target in the dollar section for $2.50.  So perfect!

Monday, November 14, 2011

Family Rules Sign... Inspired by a gazillion Pinterest finds.


I have an awkward space in my front entry.  The entryway itself extends to the ceiling of the second floor, but there's a coat closet next to the front door that does not, creating a big flat white space that is too high to conveniently access, so it's mostly been a catch-all for dust and socks and bouncy balls.  I put a couple things up there, but it's never really felt like a purposeful space.

So lately when I've been seeing scads of wooden signs with fun quotes or family rules on them, that seemed like a fantastic solution for that space.


Inspiration found here, here, here, and here.  These are just a few of the things I pinned, but if you search "wood sign" or "family rules sign," you'll find a LOT of other inspiration as well.

So I started looking out for some old pallets or character-filled old wood.  But then I heard that it is actually dangerous to use wood pallets in your home -- they are basically filled with all kinds of bacteria and chemicals and who knows what else.  Click here for a good article from "Cheap Like Me" about the dangers.

Boo to that.  I don't like the look of old wood enough to lose sleep at night over whether my DIY project is going to give my family cancer.  So my plans kind of hit a wall until I saw this pin about using vinegar and steel wool to age new wood.  What?!  I didn't really understand how it worked from that blog post, so I did a little more googling and found this post from {Show & Tell}.

Well, after I found that I could not stop thinking about this project until I did it, even though I had approximately a gazillion other things that really needed to be done first.  I did it in bits and pieces over a couple of weeks, but really it only took a couple hours of actual work and I LOVE the result!  I took pictures along the way so I could share a tutorial with you.

cap
First, buy cheap fence pickets from your local lumber source.  I picked up these 3 1/2"(ish)x6' cedar pickets at Home Depot for about $1.37 each, and I used 6 for this sign.  I used my circular saw to cut off the "dog ear" picket part, then cut each picket in half.


To prepare the vinegar wash, I got an old glass jar out of my cupboard and cut up a piece of steel wool into the jar.  I then filled the jar with vinegar and let it sit for 24 hours.  The vinegar will start to disintegrate the steel wool (I used 0000 grade steel wool, which worked great.  Since you're trying to break it up, I'd imagine the finer the steel wool the better).  I shook it every once in a while, mostly because I'm not good at just sitting and waiting.


After the 24 hours, I just used a cheap-o paintbrush to dip in the vinegar solution and brush it over the wood.  And just like magic, the wood immediately began to "age."  When you get to this point, experiment a little with the strength of your solution.  When I first brushed it on, it turned almost black.  I added a little water to my solution until it turned just the right grey-brown.  (I experimented on one of the pieces that I was going to use for the back of the board.)  You can see in this pic the difference between the straight solution on the left and the slightly watered-down version on the right.


I treated all the wood -- it seriously took me less than 5 minutes to brush the solution onto all the pieces after I figured out the right solution -- and let it dry thoroughly.

New wood on the left and vinegar/steel wool treated wood on the  right.


I then let my kids (since this was a collaborative project) decide how to lay them out, then we flipped them over and use two of the boards to put them all together from behind.  My original plan was to use screws to attach them securely, but I decided that since it wasn't going to hang and there really wasn't going to be a lot of stress on the bonds, I would just use Liquid Nails adhesive glue to put it together.  Once we got it on, we stacked paint cans on the boards to keep them firmly in place while the adhesive set.  (Actually, first Sam and I stood on it, but we eventually got bored...)

This might actually show the difference between the treated and untreated wood better than the  other picture, because you can see where all the splashes have changed the back just in spots.

I used yellow paint to freehand the branches on, then lightly sanded the whole sign.
Bright yellow tree -- not quite what I envisioned.

Everything sanded -- much better.
My family and I collaborated on what our family rules should be.  "Have fun along the way" is our family motto -- all about loving and appreciating and being grateful for where you are in life instead of waiting for something to come along and make you happy -- and the rest were things the kids or I thought up.  In the end they wanted more than I wanted to put on!  There are several ways that you could put your letters on the wood, but I laid it all out on the computer, then used my Cricut and Sure Cuts a Lot software to cut a stencil out of vinyl.  It took 4 12x14 sheets of vinyl to get the whole sign.


With the vinyl adhered, I just used a cheap brush and some leftover white paint (from my kitchen cabinets) and kind of half-brushed, half-stippled it on.  I wanted a really worn finish, so that technique worked really well.  At the bottom I hand-painted the "always."


I let the paint get mostly dry, then removed the vinyl and voila!  A real (and really meaningful) statement piece of art for my entry that cost less than $20 beginning to end.


You can see it as you whether you are coming into the house or leaving, and it fills the space quite nicely.  The finished product is nearly 3' square.  I'm still working on exactly how to style the area around it, but for now the little yellow birdie in my vintage canning jar is making it a happy space.


Thanks for stopping by!


I'm linking up to these fantastic parties!
Tip Junkie handmade projects

get your craft on button


Monday, November 7, 2011

Quick Vintage Birthday Card

I love when I get to make cards or gifts for my sister-in-law Caitlyn -- she's crafty, too, and our styles are really similar.  So it's no surprise that when her birthday rolled around this year I had no trouble finding inspiration for her card.  This came together so quickly and is definitely one of my favorite cards I've made recently.

I first cut a 4x4 square of book-y paper from 7Gypsies and stamped 3 flowers onto it.  I used pearlescent chalk from Pebbles, Inc. to color all around the image, then used a Viva Pearl Decor pen to dot the centers.  I mounted that to a kraft cardstock base and added the stamped sentiment (Studio G).  I added the lace trim (Fancy Pants) and velvet trim (Stampin Up) to the bottom and I was done!  I adhered the trims with Scor-Tape.

Isn't it funny how some cards or projects you agonize over and spend forever on and then you're still not sold on the result and other ones just come together perfectly, quickly, and you love them?

Wednesday, October 26, 2011

Dashboard confessional...

Lately I have been so on-the-run that I haven't had time to properly photograph my cards before getting them to the people I made them for, but when I downloaded the pics from my iPhone I noticed a new pattern emerging -- pictures of cards that I took at the last second in my car before the event I was going to.  The pictures aren't that great, but the cards are so dang cute I still wanted to share them. :)

This first one is a "Congratulations on your retirement" card I made for my great-aunt LaWana.  This one was so last-minute that it was a good thing it was a two-hour drive to the family reunion so that pearl drops had a chance to dry!


For this one I created the rosette with the Tim Holtz rosette die, then added a punched butterfly and flowers (EK Success) and a stamped sentiment (SU) over a strip of scallop border punch (SU).  The pearl drops are from a Viva Pearl Decor pen.  I also embossed the butterfly with my Cuttlebug.

The second is a "Welcome Home" card for my Uncle Terry and Aunt Gae, who just returned from an 18-month LDS mission to New Zealand.  I took this one in the driveway of their house before heading into the welcome home party.  Then I forgot to ever give it to them.  Now that I think of it, it might still be on the passenger seat of my hubby's car.  Oops... I better get on that.


 For this one I cut a window card by setting it up with a shape from Gyspy Wanderings on my Gypsy.  Then I cut lots of blue and green scallops (Plantin Schoolbook) to create the sky and grass.  The cute little house is from Zooballoo and HOME is from Country Life.


Hope life is going to slow down just a touch after next week and I'll be back with a new project.  I have one in the works right now that I am SO excited about!  Thanks for stopping by today!

Friday, October 21, 2011

Cute Halloween Treats

Watch out, these are "poooooky," as my 3-year-old described them!  I'm no food blogger, but I just had to share the cute treats we enjoyed at the very fun Halloween party my sister-in-law Esther threw last weekend.

1. Esther asked me to make these Monster Fingers from Family Fun.  The instructions made them seem complicated and time-consuming, but they really weren't too bad.  And look how dang cool they are!


2. My kids' favorite was Esther's Witches' Brooms -- just a pretzel rod wrapped in a fringed-up fruit roll-up.  This was the treat my 5-year-old could NOT stop talking about.


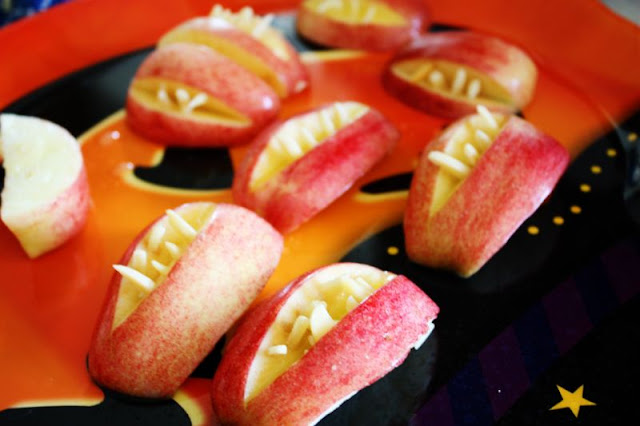
3. Chad, my brother-in-law, made these spooky apple mouths with snaggly almond teeth.  Just cut a wedge of apple, cut a "mouth" out of the skin side, and poke slivered almonds in.


4. For the main course, Mummy Dogs!  Hot dogs wrapped in crescent roll dough with mustard eyes.


5. My favorite part was the Monster Eyeballs I made with my boys!  I got the idea from Pinterest. (I think the original post was on eighteen25, but it's one of those orphan repins that doesn't link to anywhere. Make sure you are pinning from the actual post, so you and others can find it again! Update: I found it here.) It's just Oreo cookies dipped in almond bark (that white candy coating), and then you add a gummy Lifesaver and a chocolate chip to the middle.  I put them in the freezer to set up, and when they were all done I took a little food coloring pen to make the squiggly lines. They were adorable to look at and surprisingly delicious!


There you have it -- my contribution to Halloween this year. :)

Wednesday, October 19, 2011

80th Birthday Celebration


My dear Grandpa Tarbet just turned 80, and we (his wife, kids, and grandkids) decided to throw him a fantastic huge party to celebrate!  My grandma and I coordinated everything, my awesome uncle served up some excellent food, and pretty much everyone pitched in to help.  It turned out wonderfully -- family traveled from all over the country to be there, and people from every part of my grandpa's life came to honor him.  He was so happy.


And now I'm so happy to share all the fun details of the party with you!


As I started to plan the decor for this party, I knew that I wanted it to be great to look at but also truly meaningful.  My grandpa was a technical writer, and writing and words have been important to him throughout his life.  But without doubt, the very most important thing to him is his family (he has over 100 descendants so far!), and I wanted to incorporate that as well, and I thought that pictures of Grandpa and the people he loves throughout his life would be a really meaningful way to do that.  "Words+Pictures" became my theme.


I started setting the mood with this invitation, which I designed using Echo Park's "For the Record" digital kit and had printed at Costco as described here.  


The basis for the "Words" part was book paper.  I found a nice thick textbook from the 60s at DI (our local thrift store) -- it was perfect because the paper was aged nicely and it was pretty much solid text, and I also didn't feel like I was destroying a great literary work.  For the pictures, I gathered pictures from my Grandpa himself and from several family members (whoever I could beg or coerce into digging through their mounds of old pictures).  My Grandma and I spent hours scanning in all the photos my Grandpa has saved throughout the years, and we ended up with hundreds of great photos to use.  I had them printed and used them in many different ways through the party decor.  I also used that same Echo Park "For the Record" collection (this time the real paper version) to create continuity throughout.  Let me take you through the party the way we had the guests go through!


Sign-in Table
I had a vision for this in my mind of how so often when you go to the home of an older person, they have a huge collections of family photos from throughout the years collected in a huge hodge-podge.  I collected frames from DI, yard sales, and my own house.  I left most of them as I found them because I wanted an eclectic, collected-over-the-years feel, but I did spray paint some black that were weird colors.  I printed everything a 4x6, so thephotos in the 5x7 frames were matted with the Echo Park paper.  (I also grabbed some accessories from my house to make it homier and also to give me more levels for the frames, as in the little suitcase on the left).


I also used the "For the Record" paper to create pages for a sign-in album.  I wanted to keep this simple, so I made all the pages the same (just varying the pp used).  I cut 2" strips of patterned paper, backed it with a strip of black scalloped paper, and then added a stamped "Birthday Wishes" sentiment in the center.  (Scallop punch and stamp -- Stampin' Up, label shape -- Cricut "Once Upon a Princess" cartridge)


Once people had signed in, they came into the living room, where my grandpa and grandma were holding court, as it were. :)  They had lots of opportunity to visit with people without having to move around too much, since my grandpa doesn't like to be on his feet too long.


From the living they went through the dining room, which we turned into a spot for a photo shoot with a backdrop we rented for $10 from a local camera store.  My brother Dan (a really awesome photographer) was stationed there, taking pictures of all the guests as they came through.  We wanted to make sure that Grandpa had pictures of all his guests and that we didn't miss anyone.  The pictures turned out awesome!
Just one of hundreds of photos showin' the love. This one is my brother and two of my cousins with my Aunt Penny.  Yes, weirdness does run in our family.  Weirdness and love. :)


Once the guests had their pictures taken they moved into the kitchen/family room area, where we were serving dinner.  


Centerpieces:
I wanted the centerpieces to be real conversation starters, so I really tried to combine the "words+pictures" theme here.  I started by mod-podging book paper onto glass jars (empty Adams peanut butter jars that I had been hoarding forever), then potting a small mum in each one.  I cut chalkboard labels (2 for each jar) and planned to write interesting facts about Grandpa's life but quickly realized that regular chalk or my chalk marker wouldn't write nearly small enough to fit more than a few words on.  But guess what!  I used my white Gelly-Roll pen and it worked like a charm -- it even erased with damp cloth, just like a chalk marker.  Cool.


For the picture part, I bought these 99 cent 2-sided frames from IKEA.  They only come in white, so I spray painted them all black.  I also added a small tag label for each picture hung on twine.  The picture and vase went onto a little tray from the dollar store along with some little candles, just to make it cosy.  


I also punched lots of additional circles from my leftover "For the Record" paper to sprinkle like big confetti on the tables.  The pictures on the tables were leftovers from our other photo projects that we still wanted to let people enjoy.


Photo wall:
This was the toughest part of the decor for me, because it didn't turn out at all like I envisioned.  I started by cutting hundreds of circles of book paper and then sewing them into long strands of garland.  Those did turn out just perfect -- the way they turned and twisted added a ton of dimension to the display.  What I didn't take into consideration was that the pictures would twist and turn the same way.  But the basic idea was this:  I sprayed little silver binder clips with Oil Rubbed Broze spray paint, which made them look all vintage-y and cool, and we clipped up the pictures in long strands.  This created the other aggravation -- those pictures would NOT stay straight clipped up that way.  I think it would have worked better if we had maybe hung wider strips of ribbon and glued the pictures to it so they wouldn't have twisted so easily.  Or maybe glued the pictures back to back so you could still see a picture either way it turned.  As it was, we didn't have time to try either solution.  I nearly threw in the towel on this display, but my aunts kept putting it all up and I'm glad they did -- it may not have matched my vision, but people still really enjoyed it and spent a lot of time looking at all the pictures.


The best part was that my Grandpa really loved all the pictures.  He spent quite a bit of time walking around all the tables and the wall, looking at everything.  He kept exclaiming "I haven't seen this picture in years!" or "I've NEVER seen this picture!"  It made my heart happy.


One last stop:
After the guests had visited and gotten their picture taken and been stuffed with delicious barbeque and delighted by the fun program we put together, we sent them on their merry way.  But not without one last treat!  My grandma had the idea to set out some of Grandpa's favorite treats as a kind of little party favor, so I set up this table where people had to pass it to go out the door.  Don't apothecary jars make everything so much prettier?  I also added some of the frames I hadn't been able to fit on the sign-in table.


Whew!  That was such a fun party.  I really love how (almost) everything turned out so beautiful, but even more than that I loved making my Grandpa feel so special.  I loved getting to work so closely with my Grandma on all the planning and execution.  I loved seeing so much of my family and getting to work together and spend time with them.  That is what makes all the hard work for an event like this worth every second!


I'm linking up to these fantastic parties!