Tuesday, October 12, 2010


Tuesday, October 5, 2010
Life's Ups and Downs -- Summer Vacation

This month ScrapbookPal.com sent me the Cricut Summer Vacation seasonal cartridge. I've never tried one of these mini-type cartridges before, but this one turned out to have lots and lots of fun shapes to choose from. I like the graphic style of it and I'm envisioning lots of fun projects I can use it for. For my first one I chose the classic ferris wheel shape. It's all one piece on the cartridge, but my 6-year-old had the brilliant idea to make it so it could really turn (and I couldn't say no to that, now could I?). To make the ferris wheel turn, I just cut out two in the same size -- one in black for the base and one in green for the wheel -- then trimmed away the parts on each layer that I didn't want. I then used a big brad to go through the hole in the middle so that it really will turn. Fun stuff! I do love an interactive card. :) ScrapbookPal also sent me a Tim Holtz Distress Ink pad in Old Paper. I have to admit, I had to do some googling to figure out how to use it. Man, there are a lot of cool things you can do with these! I ended up using mine to add some general distressing to my ferris wheel and background papers. Old Paper is the perfect color for that purpose. (You can't tell in the picture, unfortunately, but I also sprayed the green layer of the ferris wheel and the bottom patterned paper with Glimmer Mist, just to make it a little snazzier. Love that stuff!)
Other materials: Patterned paper -- Scenic Route (top and bottom), Scribble Scrabble (green with little dots); Punch -- Stampin' Up; Brad - Making Memories; Foam Adhesive -- Thermoweb
Wednesday, September 22, 2010
House Before and Afters
We put our house up for sale almost two months ago, and boy, this market is rough! We don't have a lot of equity, so we decided to make some changes that would be low budget but hopefully high impact. I thought you might like to see my two biggest projects!
Project #1 -- The Master Bathroom
I really wish I had taken a true before picture, while the walls were still a gross hospital-gown-green color. I painted that back when we first moved in and hated in ever since, but I was always too lazy to repaint (plus I could never trust myself to pick the right color!). Before we listed the house I painted it the same tan as our bedroom, but then it was SOOOOO boring. It actually made our boring ugly we-had-no-money-for-upgrades-when-we-built-this-house cabinets look even worse, probably because now you had nowhere else to look...
Before:

After:

Biggest impact is definitely painting the cabinetry. It seriously looks like a million bucks compared to what was there before. I also framed out the mirror, following the tutorial here. We replaced the ugly mini-blinds with pretty honeycomb shades, and I made super basic toile valances. My favorite score? The light fixture was $17.49 at NPS Store, a big overstock/scratch-and-dent warehouse place in Salt Lake City. The shades were ugly and one of them was broken, so I spent another $12 to replace them with these pretty seeded glass shades. I even got the lightbulbs at IKEA for 29 cents a box. Oh, how I love a deal.
Project #2 -- Repainting the Kitchen Cabinets
I have been wanting to do this for YEARS, but the hubs was not a fan of the idea until he saw the impact in our master bathroom. Then he realized that yes, I was right and we did, in fact need to transform the ugly cabinets downstairs as well.
Before:

After:

Since we wanted light cabinets and the walls were white, I first had to repaint our whole main floor. Let me tell you -- the color "Harmonious Tan" from Behr is decidedly green, but it's a very nice green! It's what I would have picked as a green had I not been completely scared away from green by my disastrous previous experience (see bathroom history above...). I then scrubbed up the cupboards really well, gave them a light sanding, and went to town on the refinishing. I LOVED the look of this kitchen redo, so I followed her instructions for adding the beadboard wallpaper to the insets. I'm not in love with the color of my cabinets -- I think the "Bleached Linen" (Behr) color I picked is too bright white, but it's definitely a huge improvement over what we had before. I am in love with the stuff up above my cabinets, but that's another post for another day...
I think these projects make the house look a lot more "custom," so hopefully the buyers out there will realize they are just dying to move right in!
Project #1 -- The Master Bathroom
I really wish I had taken a true before picture, while the walls were still a gross hospital-gown-green color. I painted that back when we first moved in and hated in ever since, but I was always too lazy to repaint (plus I could never trust myself to pick the right color!). Before we listed the house I painted it the same tan as our bedroom, but then it was SOOOOO boring. It actually made our boring ugly we-had-no-money-for-upgrades-when-we-built-this-house cabinets look even worse, probably because now you had nowhere else to look...
Before:

After:

Biggest impact is definitely painting the cabinetry. It seriously looks like a million bucks compared to what was there before. I also framed out the mirror, following the tutorial here. We replaced the ugly mini-blinds with pretty honeycomb shades, and I made super basic toile valances. My favorite score? The light fixture was $17.49 at NPS Store, a big overstock/scratch-and-dent warehouse place in Salt Lake City. The shades were ugly and one of them was broken, so I spent another $12 to replace them with these pretty seeded glass shades. I even got the lightbulbs at IKEA for 29 cents a box. Oh, how I love a deal.
Project #2 -- Repainting the Kitchen Cabinets
I have been wanting to do this for YEARS, but the hubs was not a fan of the idea until he saw the impact in our master bathroom. Then he realized that yes, I was right and we did, in fact need to transform the ugly cabinets downstairs as well.
Before:

After:
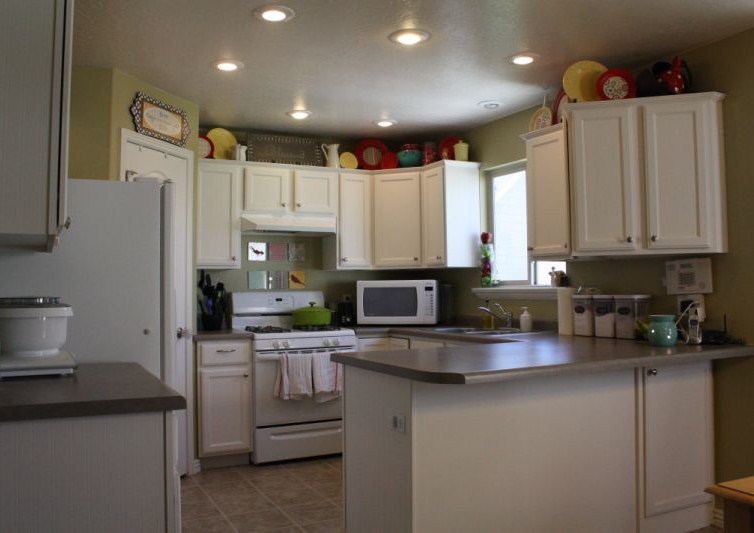
Since we wanted light cabinets and the walls were white, I first had to repaint our whole main floor. Let me tell you -- the color "Harmonious Tan" from Behr is decidedly green, but it's a very nice green! It's what I would have picked as a green had I not been completely scared away from green by my disastrous previous experience (see bathroom history above...). I then scrubbed up the cupboards really well, gave them a light sanding, and went to town on the refinishing. I LOVED the look of this kitchen redo, so I followed her instructions for adding the beadboard wallpaper to the insets. I'm not in love with the color of my cabinets -- I think the "Bleached Linen" (Behr) color I picked is too bright white, but it's definitely a huge improvement over what we had before. I am in love with the stuff up above my cabinets, but that's another post for another day...
I think these projects make the house look a lot more "custom," so hopefully the buyers out there will realize they are just dying to move right in!
Tuesday, September 21, 2010
Hope Your Birthday is Magical!
I am so in love with the artwork on the Once Upon a Princess cartridge that I received from ScrapbookPal.com! It's very cute, with just the right amount of spunky-ness to keep it fun and un-cheesy. I also received great embossing folders that are made to coordinate with the artwork on the cartridge (what a great idea!) and these neat Smooch inks. They come in what looks like a little nail polish bottle, and they have a fabulous metallic finish that is great for accenting.
For this card I first embossed the background and then sanded it to bring out the details. I then cut the little fairy at 3 1/4". These multi-layered cuts definitely take a while to cut and assemble, but they are so adorable it's worth the extra time! I used the apple green Smooch ink to add the little metallic dots to the edge of her dress and hat, which was such a nice touch. The little cloud-shaped label and the phrase "Magical" are also from OUaP. I used my SU scallop border punch to create the grass below.
Here's another sweet little cut from this cartridge. I cut this angel at 3 1/2" and paired her with a great quote to create a bright, happy card for someone I know who needs a pick-me-up. I colored her halo with the Olive Green Twist Smooch, which comes out a nice deep silver color.
 Thanks for looking! This cartridge is definitely one of those that gives you a TON of artwork to work with -- between all the cute little dollies, the great icons, the phrases, the labels, and the alphabet, I've barely scratched the surface!

For this card I first embossed the background and then sanded it to bring out the details. I then cut the little fairy at 3 1/4". These multi-layered cuts definitely take a while to cut and assemble, but they are so adorable it's worth the extra time! I used the apple green Smooch ink to add the little metallic dots to the edge of her dress and hat, which was such a nice touch. The little cloud-shaped label and the phrase "Magical" are also from OUaP. I used my SU scallop border punch to create the grass below.
Here's another sweet little cut from this cartridge. I cut this angel at 3 1/2" and paired her with a great quote to create a bright, happy card for someone I know who needs a pick-me-up. I colored her halo with the Olive Green Twist Smooch, which comes out a nice deep silver color.

Sunday, September 5, 2010
Table fit for a princess...

I was so darn excited when ScrapbookPal.com sent me the Once Upon a Princess to work with this month. It is just chock full of the cutest, girliest art you could imagine. (Is it so wrong that my first thought when I found out I was having a girl was that I could finally indulge all my girly papercrafting fantasies?) My first project for the month was a no-brainer -- my little princess just turned two, and she is really into playing pretend. I wanted to get her her own little table and chairs where she could have tea parties with her dollies (and her mommy, of course), but I certainly couldn't leave it just plain white! I already had some yummy pink and green vinyl on hand, just the right colors for her bedroom, so I just got out my Gypsy and my Expression and went to town. :)
I started by measuring the table and deciding how big I wanted each element. I chose the cute princess crown for the center, but substituted an Alphalicious "e" for the OUaP font so it would match what I've already done in her room. This is where the Gypsy really shines -- it was so easy to just use the "hide contour" function to get rid of the OUaP "E", then I was able to group the two elements together so that I could resize and move them easily. I surrounded the crown with this sweet scalloped circle, which is one of the labels. I super<3 all the labels on OUaP -- so versatile! I particularly like this shape because the scallops are not perfectly round, giving it more of a flower petal look. That center element is 11.5".

I decided to place smaller flowers around the edges, as sort of place settings. This super cute flower is actually one of the princesses' accessory, so again I used the "hide contour" function on the gypsy to hide the other accessories that I didn't want to cut. Easy as pie!

For the chairs, I used the scallop border from Plantin Schoolbook, then made dots with the centers of the pink flowers on the table and a circle punch. On the little stools, I just used a little flower punch on the leftover green vinyl from the center of the big green scallop circle in the center of the table. Can't let that vinyl go to waste, after all...

Thanks for looking! I hope you'll come back soon -- I have a lot more fun Once Upon a Princess projects planned for this month!
Monday, August 30, 2010
A little faux-stache fun...

First, I designed the mustaches for the above card, then rounded up pictures of some of our family and friends and 'stached them right up. I'm sure they won't mind... Dan got a good chuckle out of it, and the kids were literally rolling on the floor.


As a bonus gift for Dan, I did not buy the Cricut Lite Billionaire cartridge, which has the most adorable mustaches, even though I stood there in Walmart for about 5 minutes debating about it. Instead, I used my gypsy -- I found some nice apostrophe shapes (I believe these are from Jasmine and Winter Wonderland), made two, then flipped one and welded them together. Voila!
Happy birthday, baby. Love you! (And your awesome facial hair...)
Monday, August 23, 2010
Completely off-topic -- Shout out to Single Dad Laughing...
If you're looking for the blog hop, CLICK HERE or just scroll down!
Little known fact about me: I am the oldest of ten kids. We've had a lot of craziness in our family, as I'm sure you can imagine. My brother Dan and I are only 16 months apart, and we had more than our share of sibling issues growing up, culminating with me literally trying to beat him up while under the influence of cold medicine (last time I ever took Nyquil) because he called me a baby for trying to tell on him. And yes, we were technically adults at the time. But now we're REAL grown-ups, and we're pretty tight, mostly because he realized that I was right about everything...
But I digress. Dan just started a most entertaining blog, all about his adventures being a single dad. He posts very funny and only slightly bitter observations about parenting and single life every day, but honestly I would follow it just for the cuteness provided by his adorable son Noah (who you might recognize from several of the scrap projects I've posted over the years).
Today's post is his first video blog, about Facebook Pet Peeves. It's about 13 minutes long, so make sure you have some free time -- I laughed the entire time. Check him out!
Little known fact about me: I am the oldest of ten kids. We've had a lot of craziness in our family, as I'm sure you can imagine. My brother Dan and I are only 16 months apart, and we had more than our share of sibling issues growing up, culminating with me literally trying to beat him up while under the influence of cold medicine (last time I ever took Nyquil) because he called me a baby for trying to tell on him. And yes, we were technically adults at the time. But now we're REAL grown-ups, and we're pretty tight, mostly because he realized that I was right about everything...
But I digress. Dan just started a most entertaining blog, all about his adventures being a single dad. He posts very funny and only slightly bitter observations about parenting and single life every day, but honestly I would follow it just for the cuteness provided by his adorable son Noah (who you might recognize from several of the scrap projects I've posted over the years).
Today's post is his first video blog, about Facebook Pet Peeves. It's about 13 minutes long, so make sure you have some free time -- I laughed the entire time. Check him out!
Subscribe to:
Posts (Atom)