
Thursday, July 31, 2008
Ack, I've lost my blog list!
Okay, in the shuffle of creating a new look for my blog, I've lost my bloglist! If you know of a great blog I should look at (and yes, that means YOUR blog), please leave me a comment with the address! Thanks!
Wednesday, July 30, 2008
Fun with needlepoint, plus a great sketch...
Another great sketch from 2 Sketches 4 You this week! It is so fun to bloghop through all the submissions each week -- I am just amazed at the talented cardmakers from all over the world who take on the sketches. Here's this week's sketch, from Laura:

And here is my take on it!

I pulled out these felt flowers from Fancy Pants and felt like they needed something a little extra, and for me that usually means some decorative stitching! I had fun with these especially because I relearned how to embroider a french knot, which I had learned to do in junior high but could never quite get the hang of again. I found a great video tutorial at Needle'nThread that made it so easy.
For these cards I used the Fiskars Threading Water punch to make the flower stems (see a tutorial here), and the Cuttlebug Olivia font for the "thanks." The pp is from My Mind's Eye, Magnolia collection.
Tuesday, July 29, 2008
I'm going to try something wild and crazy...
I've been wanting to try a new blog layout, so I really hope it works okay and I don't lose everything on my blog! Wish me luck!
Okay, here's version #3 -- I'm giving a go at doing it myself! I really like this header (I know, I know, I'm obsessed with this font) because it incorporates the birdie and flourishes I drew myself! Now I need to figure out how to do a background. What do you think?
Hmmm... I've got a background, but it's got weird seams with the tiling. Guess I've still got some things to figure out.
Eureka! I think this is it -- the finished product. How do y'all like it?!
Saturday, July 26, 2008
Well, that was a bust...
I learned an important lesson today -- a beautiful sunny Saturday in July is not a good time to host a boutique, no matter how much publicity you do for it. :( I was so disappointed in the turnout at the boutique today! We had maybe 10 people show up (maybe 15 if you count my nephew and the guys that came with my mom and sisters -- thanks Reubz and Dave!). Since I did over 200 invitations, advertised on KSL and craigslist, and invited almost 100 people via Facebook, plus made huge signs to go all over the neighborhood, it was very disheartening. Mostly I just felt really bad for all the other vendors given up their Saturday for so little result. It was a darn good thing my mom did come -- I think she was the main buyer for just about everyone there!
But, looking on the bright side, it at least motivated me to get my house really clean. Now maybe we can keep it that way until Eliza's born (hmmm, 5 more weeks? Here's hoping!). And I did have fun getting ready for it, with all the fun projects I did. Oh, and my sweet hubby painted my bedroom today (I think he was trying to escape from all the girly-ness in the rest of the house) and it looks so much better! So the day was definitely not a total loss. Thanks for letting me vent!
But, looking on the bright side, it at least motivated me to get my house really clean. Now maybe we can keep it that way until Eliza's born (hmmm, 5 more weeks? Here's hoping!). And I did have fun getting ready for it, with all the fun projects I did. Oh, and my sweet hubby painted my bedroom today (I think he was trying to escape from all the girly-ness in the rest of the house) and it looks so much better! So the day was definitely not a total loss. Thanks for letting me vent!
Wednesday, July 23, 2008
All sorts of goodies...
I have been busy-busy getting ready for the boutique on Saturday. It's my first try at actually doing something as a Memory Works rep, so I wanted to make it a good one. I chose a few of the collections and tools from the new catalog and decided to show just how many projects you could make with each the thing. Here we go!
From the Cosmo Cricket "Honey Pie" set:
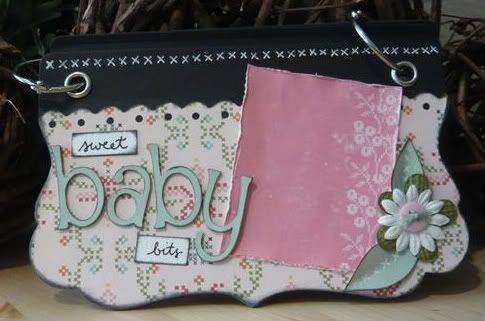
This one also uses a "blackboard" album from Cosmo Cricket, Prima flowers, and "baby" is cut with the Alphalicious cartridge. I did the scallop edge with Threading Water. The inside pages are covered with paper, but no pictures because it's waiting for baby Eliza! (You'll notice this is a common theme with all these girly things.)
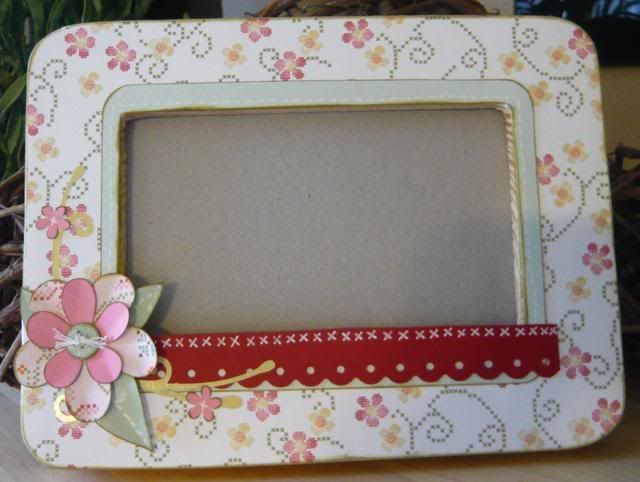
This altered frame is something I made for a challenge at the Cricut SWARM this past weekend. The flowers are from the George cartridge and the swirly thing in the background is from Joys of the Season.
I did this layout at the SWARM as well -- I love it when things come together quickly! I usually don't do layouts before I have pictures to put in them, but I'm sure I'll have lots of material once this baby makes her appearance!

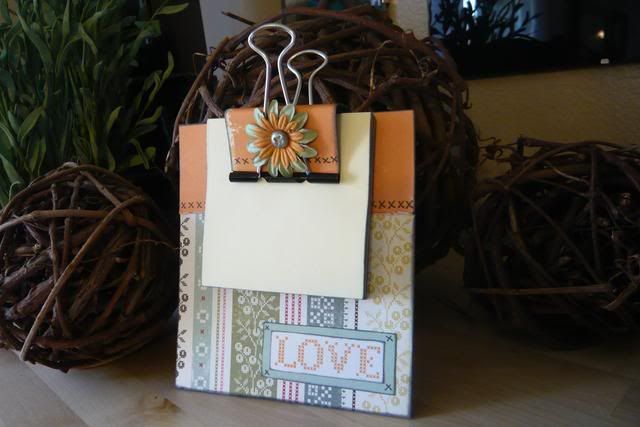
This cute post-it note holder was our make-and-take at the SWARM.
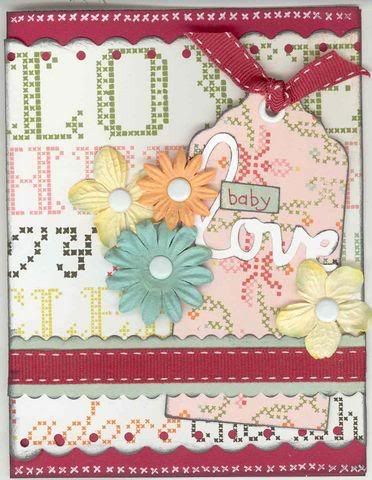
I've posted this card before, but it goes with this set:
The next few projects are from the Cosmo Cricket "Cogsmo" line -- I just love the cute little robots on this paper! I'm still going to make a card or something with this collection.
This mini-album is another "blackboard" album from Cosmo Cricket. I gathered a bunch of fun pictures of the boys together that probably wouldn't have made it into other layouts -- just everyday stuff, but so fun! I cut the letters here from Zooballoo.
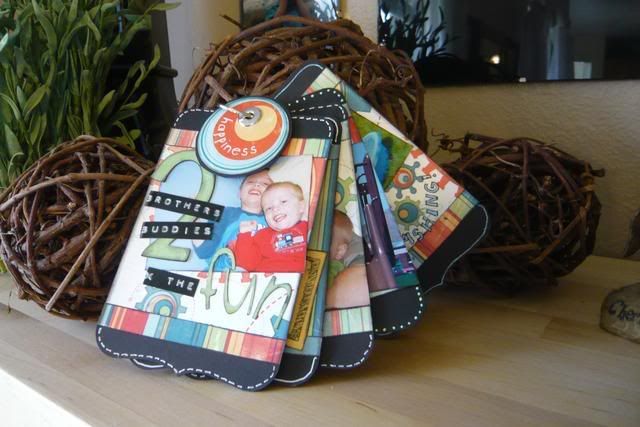
Here's a layout with the same papers, about Sammy's first "book."

And these are from the Autumn Leaves "Cuteworld Girl" set -- I can't even tell you how much I love this paper! So exciting to be able to do all these girly things! I've only used a few sheets from this set so far. I think tonight I'll make a card or two to go along with these.
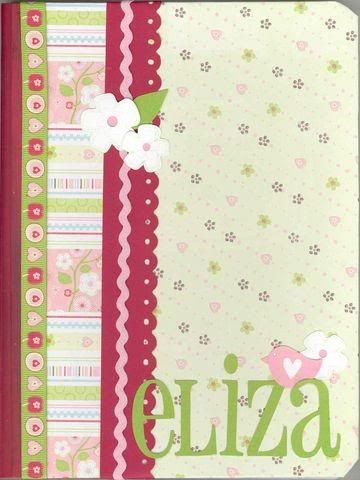
A baby book for Eliza! I also used WIMG for the flowers, and I drew the little birdie with my pen tablet and cut it out with SCAL. "Eliza" is also done with SCAL.
This layout was super quick, very possibly my fastest ever! The big flower came that way in the paper set. I came together so fast, in fact, that I took a few extra minutes to add the new Doodlebug crushed velvet flock to the flower and leaves. It's hard to see here, but it's really cute IRL.

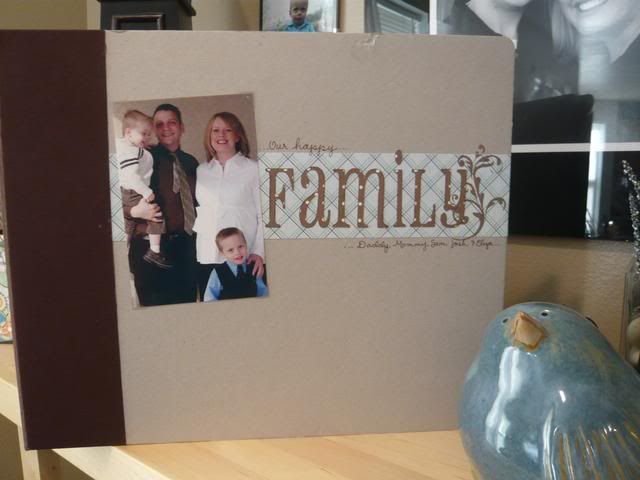
I also altered the front of this American Crafts album:
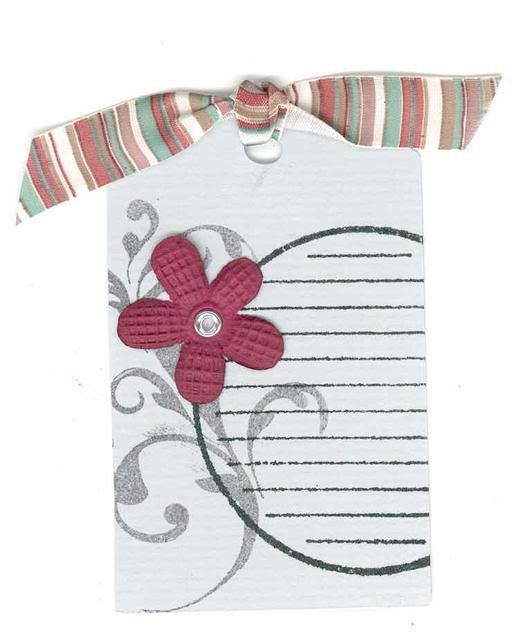
And, last but not least, this is the make-and-take I'll be doing. They'll be able to try two different stamps (both from Autumn Leaves), Primas, and the Cropadile, all things in the catalog. I think I'll ink the edges of the tag. I've never done a make-and-take before, but I wanted to make sure it was something quick and easy. What do you think?
From the Cosmo Cricket "Honey Pie" set:
This one also uses a "blackboard" album from Cosmo Cricket, Prima flowers, and "baby" is cut with the Alphalicious cartridge. I did the scallop edge with Threading Water. The inside pages are covered with paper, but no pictures because it's waiting for baby Eliza! (You'll notice this is a common theme with all these girly things.)
This altered frame is something I made for a challenge at the Cricut SWARM this past weekend. The flowers are from the George cartridge and the swirly thing in the background is from Joys of the Season.
I did this layout at the SWARM as well -- I love it when things come together quickly! I usually don't do layouts before I have pictures to put in them, but I'm sure I'll have lots of material once this baby makes her appearance!
This cute post-it note holder was our make-and-take at the SWARM.
I've posted this card before, but it goes with this set:
The next few projects are from the Cosmo Cricket "Cogsmo" line -- I just love the cute little robots on this paper! I'm still going to make a card or something with this collection.
This mini-album is another "blackboard" album from Cosmo Cricket. I gathered a bunch of fun pictures of the boys together that probably wouldn't have made it into other layouts -- just everyday stuff, but so fun! I cut the letters here from Zooballoo.
Here's a layout with the same papers, about Sammy's first "book."

And these are from the Autumn Leaves "Cuteworld Girl" set -- I can't even tell you how much I love this paper! So exciting to be able to do all these girly things! I've only used a few sheets from this set so far. I think tonight I'll make a card or two to go along with these.
A baby book for Eliza! I also used WIMG for the flowers, and I drew the little birdie with my pen tablet and cut it out with SCAL. "Eliza" is also done with SCAL.
This layout was super quick, very possibly my fastest ever! The big flower came that way in the paper set. I came together so fast, in fact, that I took a few extra minutes to add the new Doodlebug crushed velvet flock to the flower and leaves. It's hard to see here, but it's really cute IRL.
I also altered the front of this American Crafts album:
And, last but not least, this is the make-and-take I'll be doing. They'll be able to try two different stamps (both from Autumn Leaves), Primas, and the Cropadile, all things in the catalog. I think I'll ink the edges of the tag. I've never done a make-and-take before, but I wanted to make sure it was something quick and easy. What do you think?
Monday, July 21, 2008
New Things Coming Soon!
Sorry I've been absent for a few days -- I have been very busy with a SWARM (a Cricut crop) last weekend and getting ready for the big boutique here at my house on Saturday. I made a ton of fun stuff at the SWARM, and as soon as I can get the pictures taken I'll post them! This afternoon, though, I've really got to get going on distributing flyers for the boutique -- don't forget to come if you're in the area! Here's the info (click on the flyer for a larger image):


Monday, July 14, 2008
More fun with 2 Sketches 4 You
I just can't say enough about the beauty of a good sketch -- I think of it as the scaffolding on which I can create any kind of card. These sketches from 2 Sketches 4 You are the perfect example -- this first one is this week's sketch, created by Laura, and the next two are sketches provided for trying out for the design team (wish me luck!). I decided to create cards in three totally different styles with these sketches, and it was so much fun! I already had the "bones" of the design, so I was able to spend my time being creative with everything else instead of worrying so much about that. I love it!


This card is based on this week's sketch, and I love the bold, graphic style. The journaling card is special to me because I found it among my grandma's things after she passed away a few months ago. In her office supplies she had a whole bunch of fun things like this, and of course I couldn't let them just get thrown away! The pp is all from Scenic Route (the flowers are cut from the PP), and the scallop chain is done with the Fiskars Threading Water punch. The word NOTE is cut with the Cuttlebug Typewriter font.


This one is a brighter, more summery card, made just for my little sister who is away on a Church trip for the next three weeks. It's made using this sketch by Laura, and it's also my first design team entry. This cute little penguin chick is an Imaginisce stamp. The scallop circle was cut with Mini-Monograms at 3", and popsicle is from Doodlecharms, cut at 2 1/2". The green border is meant to be like a grass skirt, and the background is embossed with the Cuttlebug.


This one is based on Kazan's design team sketch, and I went for a softer look with this card. The paper is from Crate Paper, and the "Thinking of You" rub-on is from Pebbles, Inc. The swirl stamp is from Autumn Leaves -- I stamped the blue paper all in one piece, then cut it into three and added the punched flowers.
TFL!
Tuesday, July 8, 2008
My new Magnolia fetish...
I have long been in love with these Magnolia stamps, but could never find them in the US until now. I've only got a couple so far, but you can bet I'll be adding to my collection. They remind me so much of my sister Carissa -- how could I resist? I'm new at this coloring technique (Prismas and Gamsol) but I can tell I'm going to have a lot of fun with it. I've always loved coloring!
This one is for my sister's birthday. I got the sketch from the Magnolia Challenge Blog. This is the one I colored most to look like Carissa. She loved wearing flowers in her hair, and I think it will mean a lot to my sister. The PP is from the My Mind's Eye Magnolia Collection (coincidentally!), the flowers are a sizzix die, and the sentiment stamp is from Stampin Up.

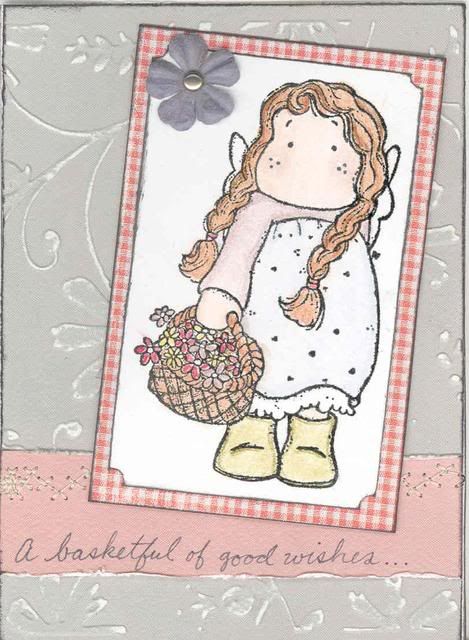
Today was my Grandma's birthday, and tomorrow she is having surgery, so I thought a whole basketful of good wishes might be in order! This pp is from Wild Asparagus, with Cuttlebug embossing. I've also used my favorite new tool, the edge distresser from Heidi Swapp, on the sentiment border. You'll see more of that in the next couple of cards!
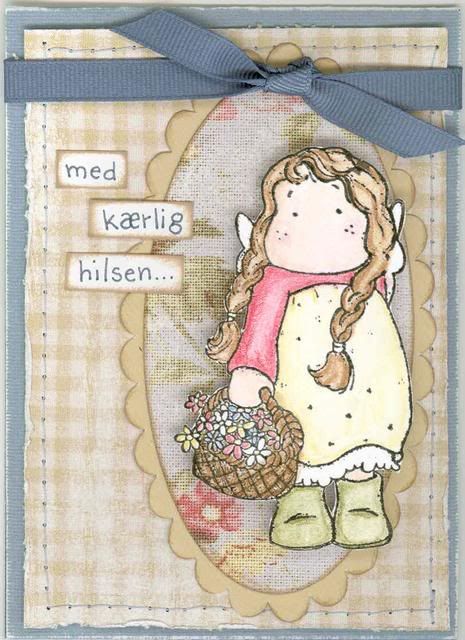
This one is for some dear friends in Denmark. "Med kærlig hilsen" basically means "hello with love." This one also uses Wild Asparagus paper. The scalloped oval tag is from the Cricut Alphalicious cartridge, cut at 5". I love how the edge distresser makes the edges of the paper curl up -- with this nice cardstock it looks like fabric!
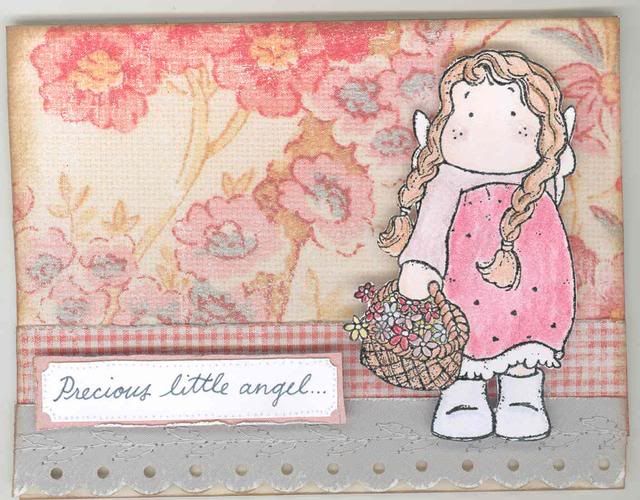
This last one is for friends of Valerie Hoyle on the Cricut Messageboard, who recently had a baby with some severe problems who won't be with them long (see her post and card request here). This one uses the same Wild Asparagus paper as my grandma's card (just the front instead of the back), and the scalloped edge was created with the Fiskars Threading Water punch. I was really digging the decorative stitching today, can you tell?!
Thanks for looking -- it's so fun to have a place to share my creations!
This one is for my sister's birthday. I got the sketch from the Magnolia Challenge Blog. This is the one I colored most to look like Carissa. She loved wearing flowers in her hair, and I think it will mean a lot to my sister. The PP is from the My Mind's Eye Magnolia Collection (coincidentally!), the flowers are a sizzix die, and the sentiment stamp is from Stampin Up.
Today was my Grandma's birthday, and tomorrow she is having surgery, so I thought a whole basketful of good wishes might be in order! This pp is from Wild Asparagus, with Cuttlebug embossing. I've also used my favorite new tool, the edge distresser from Heidi Swapp, on the sentiment border. You'll see more of that in the next couple of cards!
This one is for some dear friends in Denmark. "Med kærlig hilsen" basically means "hello with love." This one also uses Wild Asparagus paper. The scalloped oval tag is from the Cricut Alphalicious cartridge, cut at 5". I love how the edge distresser makes the edges of the paper curl up -- with this nice cardstock it looks like fabric!
This last one is for friends of Valerie Hoyle on the Cricut Messageboard, who recently had a baby with some severe problems who won't be with them long (see her post and card request here). This one uses the same Wild Asparagus paper as my grandma's card (just the front instead of the back), and the scalloped edge was created with the Fiskars Threading Water punch. I was really digging the decorative stitching today, can you tell?!
Thanks for looking -- it's so fun to have a place to share my creations!
This week's Bitten by the Bug challenge!

Our challenge this week was to use the star from George. I've used this one a lot, but most for boy-type things, so I wanted to try it in a more feminine and grown-up card. I added the flourish from JOTS in CDS, then cut the shadow with scallop scissors. The glitter dots are pink stickles. "shine" is from Stamped, welded and sized in CDS on Smooth mode and covered in translucent glitter. The corners are from Jasmine, cut on RDS at 1 1/2". Truth be told, this is one of those cards that you keep adding stuff because it's never quite right and then you hate it because you've been looking at it for so long! :) TFL!
Wednesday, July 2, 2008
Birthday card with fun flower tutorial!

I made this card for this week's sketch challenge over at 2 Sketches 4 You -- these colors are just scrumptious, aren't they? They make me want to eat sherbet!
This flower is such a fun, unexpected, TOTALLY simple touch. I did not come up with this one myself -- I saw it in an issue of CARDS magazine (The creator of the original project was Betsy Veldman.) I took these step-by-step pics of another card I created quite a while ago, and I thought some of you might enjoy a tutorial! The great thing about this technique is that you only have to be able to sew a relatively straight line. This is great if you have a lot of coordinating scraps from another project (this one is leftovers from my memory book and scrapbook pages about Carissa).
Step one: cut however many circles you want in varying sizes and colors or patterns.

Step 2: Adhere circles together -- apply adhesive only to centers

Step 3: Sew 3 or 4 intersecting lines through the center of the circles.

Step 4: Cut petals around the stitched lines. I did it freehand, but you could also draw the curves on first if that helped.


Step 5: Bend all the layers to create the layered petals.

Step 6: Chalk or ink the edges (I really like the cat's eye chalk inks) and add a button for the center. Voila!

Let me know if you have any questions!
Beautiful new (to me!) blog on my blog roll -- check this out!
So, I am totally in love with Magnolia stamps. They are so sweet. Up til now they've been next to impossible to find here in the US, but I've just found a new vendor and ordered my first stamps! You can bet I'll be posting my first projects just as soon as I get them in my hot little hands.
Anyhoo, I've been doing some surfing looking at others' creations with these stamps, and found this bee-yewtiful blog with examples of these stamps -- this is some amazing artwork! It's called Pretty Pressings. And she's doing a really great blog candy giveaway right now, so it's the perfect time to check it out
Anyhoo, I've been doing some surfing looking at others' creations with these stamps, and found this bee-yewtiful blog with examples of these stamps -- this is some amazing artwork! It's called Pretty Pressings. And she's doing a really great blog candy giveaway right now, so it's the perfect time to check it out
Save the date!
Hey, all my friends who are in Utah -- I am going to be having an open house/boutique thing at my house on July 26th from 9 a.m. - 1 p.m., and everyone is invited to come! I'll be doing a fun little make-and-take and showcasing all the great stuff from Memory Works. I'll also have several other vendors -- so far I've got Pampered Chef lined up, and I've got a few more pending. It should be lots of fun, so come by! Oh, and I'll be doing a little scrapbook liquidation of things from my own stash, so there's sure to be something for everyone.
Subscribe to:
Posts (Atom)


